This website uses cookies to improve your experience. We'll assume you're ok with this. Know more.

How to Get a Report on All Site Collections in SharePoint Online

If your organization has a vast number of SharePoint Online site collections, navigating them might be a tedious task. However, you can easily tackle the challenges of managing multiple sites with appropriate practices. This guide helps you list all SharePoint Online site collections and offers essential configurations for an organized collaborative Microsoft 365 environment.

Native Solution

Microsoft 365 Permission Required

High

Global Admin or SharePoint Admin.

Option 1 Using SharePoint Online Admin Center

  • Login to the SharePoint Online admin center.
  • Navigate to Sites»Active Sites. Under the Active Sites page, you can view all the SharePoint Online sites in Microsoft 365.
Using SharePoint Online Admin Center
  • The ‘Active sites’ page lists all the site collections, encompassing both hub and channel sites, but won’t list the root websites within SharePoint Online.

Option 2 Using Windows PowerShell

  • Connect to SharePoint Online PowerShell using the below cmdlet.
  • Windows PowerShell Windows PowerShell
     Connect-SPOService -Url https://-admin.sharepoint.com
  • Run the below cmdlet to get all SharePoint Online sites using PowerShell.
  • Windows PowerShell Windows PowerShell
     Get-SPOSite | Where-Object { $_.Status -eq "Active" } | Select-Object Url, Title
Using Windows PowerShell
  • The above cmdlet will display all the sites along with the root websites of each site collections.
AdminDroid Solution
More than 150 reports are under free edition.

AdminDroid Permission Required

Any user with report access delegated by the Super Admin.

StepsUsing AdminDroid

ad
  • Login to the AdminDroid Office 365 reporter.
  • Navigate to the All Site Collections report under Reports»SharePoint»Site Collections.
  • Using the easy filter option, set the following condition.
Using AdminDroid

Utilize the above highlighted 'Total Sites' column to access all the sites within a site collection. Additionally, you can view the site type, site’s current storage, and the owner of the site collection.

Site-type-admindroid-2
  • In addition, the report includes built-in graphs that specifically show different types of site collection, such as communication sites and team sites.

Master your SharePoint Online management with precision!

Eliminate the challenges of navigating through multiple sites! Gain a unified view of all the SharePoint Online site collections with AdminDroid.

Witness the report in action using the

SharePoint OnlineManage SharePoint Online Site Collections and Sites in Microsoft 365

Showing 1 of 7

What are the different types of SharePoint Online sites?

A SharePoint Online site functions like a website featuring various SharePoint web parts such as document library, calendar, task list, and more. It provides a centralized location for creating, sharing, and managing content.

Also, it’ll be helpful in enhancing collaboration, and information management within organizations. It caters to a wide range of use cases across different departments and teams.

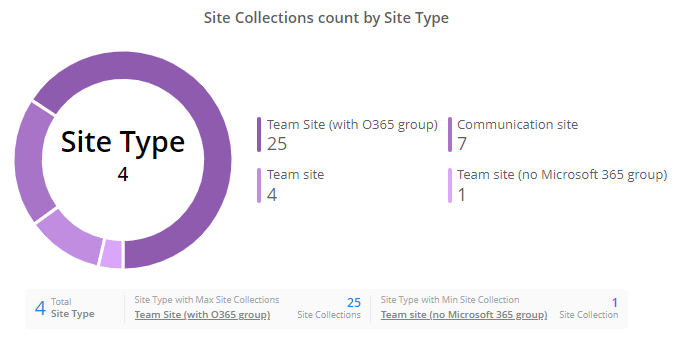
There are two primary types of SharePoint Online sites: Communication sites and Team sites.

Communication Sites

Communication sites are designed for sharing information to a broad audience and are not typically used for collaboration. While these sites cannot currently be used for external collaboration, they are suitable for securing access to a large, automatically updated group, such as all staff in a faculty.

Team Sites

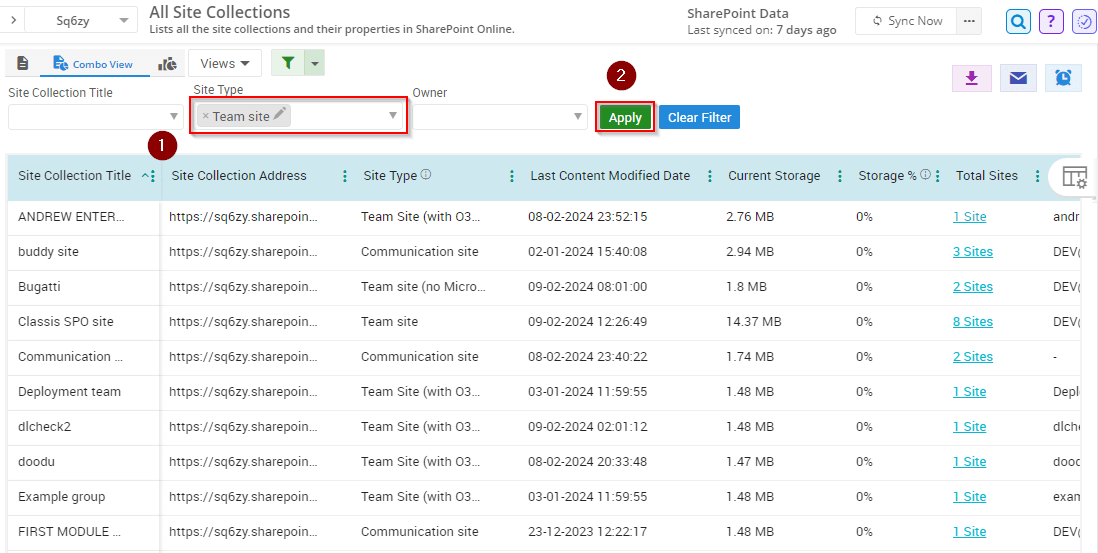
  • Team site with Microsoft 365 group: A team site with Microsoft 365 group provides a platform integrating SharePoint Online with Office 365 services like Teams, Outlook, and Planner, facilitating seamless collaboration with shared resources like calendars, task management tools, and centralized permissions.
  • Team site without Microsoft 365 group: A team site without Office 365 group lets you customize who can access them directly within the site. It plays a vital role for document storage and collaboration, and don't have as many integrated tools such as Outlook, Teams, and Planner for communication.

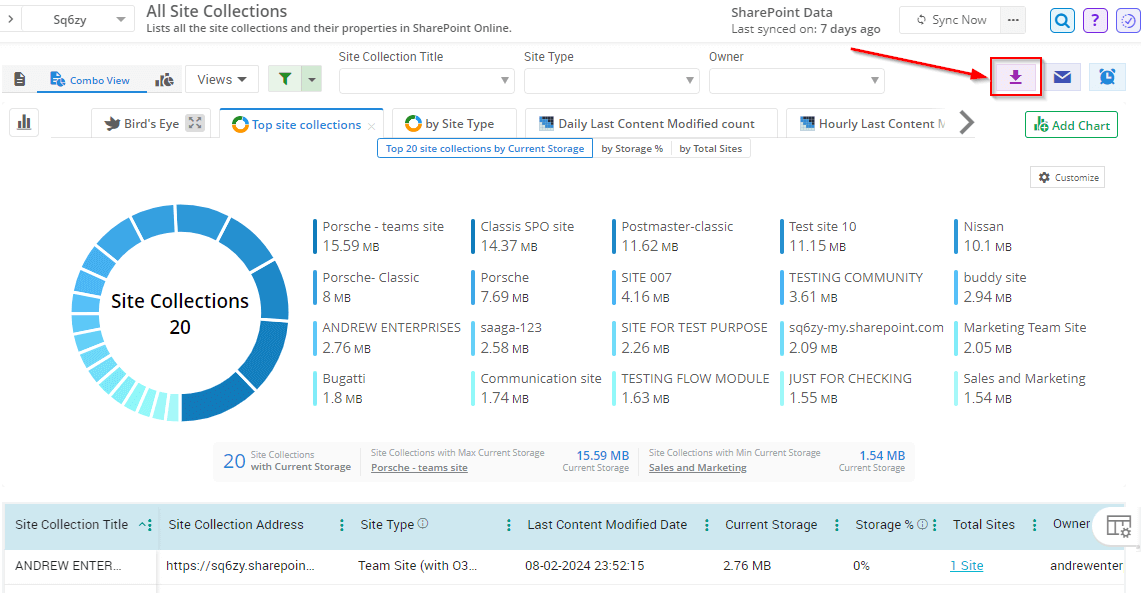
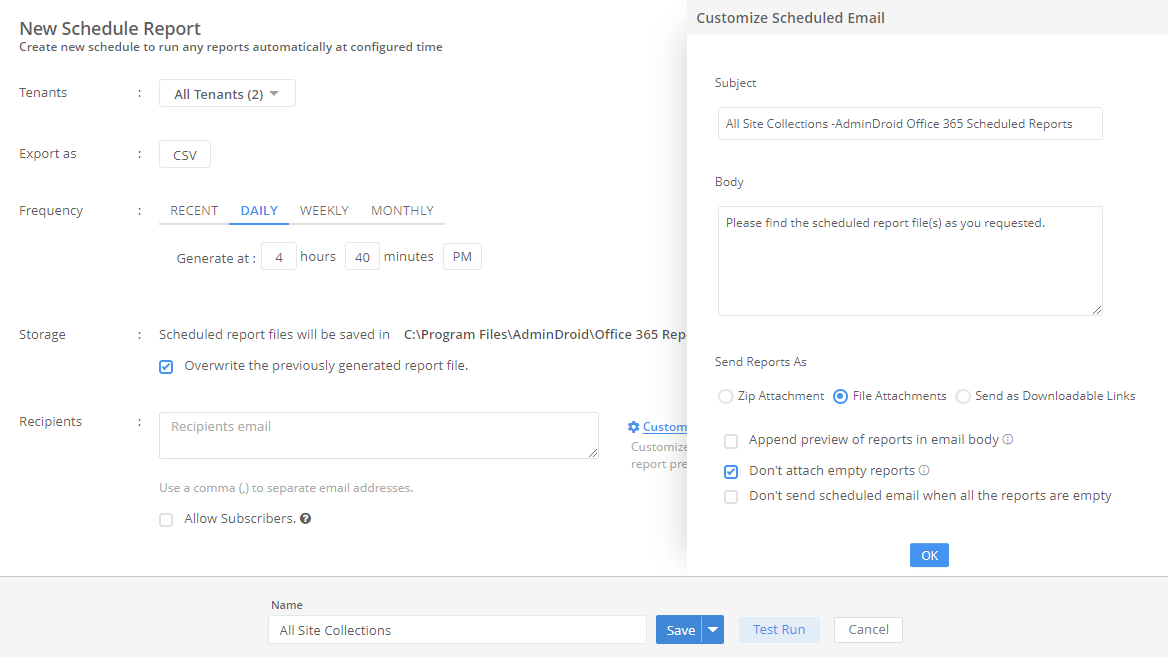
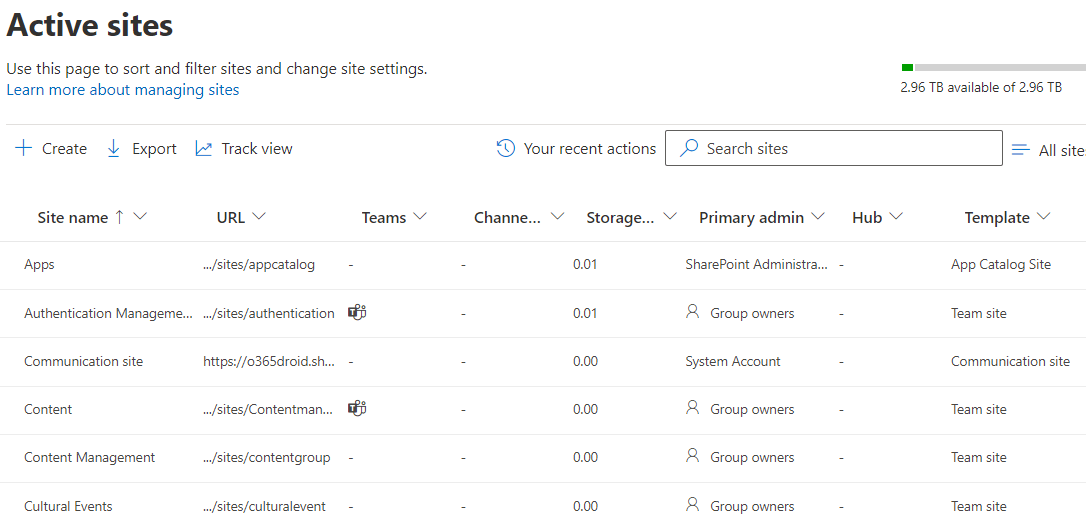
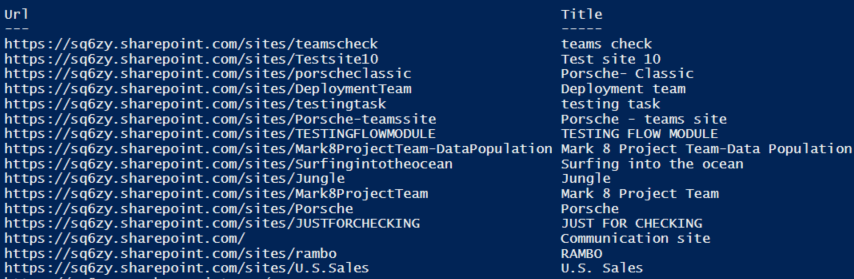
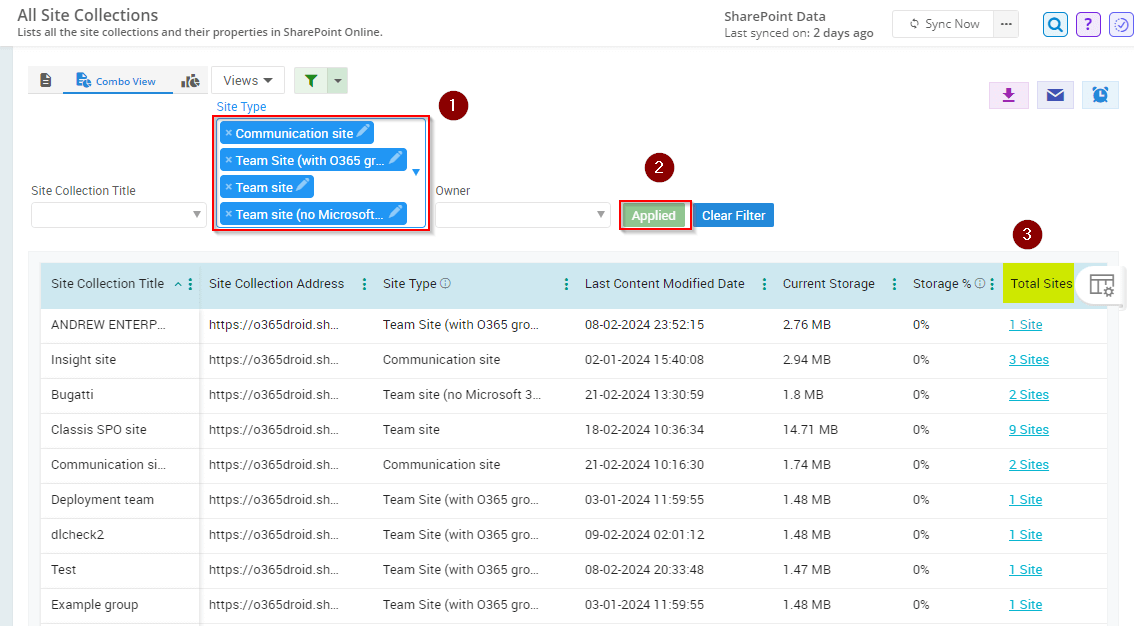
With AdminDroid’s export functionality, you shall easily export all SharePoint sites to CSV and other formats according to your preferences. Along with that, you shall easily schedule and email those reports based on your chosen settings.

export-Qn-1

How to create a site collection in SharePoint Online?

Site collections serve as groups of multiple sub sites, typically organized in a hierarchical structure where a parent site contains several subsites.


Follow the steps below to create a site collection in SharePoint Online:

  • Login to the SharePoint Online admin center.
  • Navigate to the ‘Active sites’ under Sites, and then click on Create.
  • Select the type of site you want to create: A Team site or a Communication site.
  • Then, in the Template selection section, choose a team site template and click ‘Use Template’.
  • Now, enter the site name, group email, site address, and group owner information.
  • Set language and privacy settings, then click Create site in SharePoint Online and add desired members to complete team site creation.

Create a new site collection in SharePoint using PowerShell


Run the below cmdlet to create a new SharePoint site collection using PowerShell.

New-SPOSite -Url https://yourtenant-admin.sharepoint.com/sites/yoursitename -Owner youradmin@domain.com -StorageQuota 1000 -Title "yoursitename" -Template STS#0 

What are default groups in a SharePoint site?

When a site is created in SharePoint Online, the default groups are automatically generated. These groups are configured with the default permission levels, granting users with specific rights and access.

  • Site Visitors- have read-only access.
  • Site Members- can read, download, and manage documents.
  • Site Owners- have full control over the SharePoint site, including security, adding web parts, and navigation control.

Using AdminDroid, you can easily retrieve a comprehensive list of site collections and their properties in SharePoint Online.

  • Also, it’ll provide detailed insights on total subsites, site types, and site storage information. It enables effective organization and utilization of your SharePoint environment to meet organizational needs.
  • Pro-tip: Use the easy filter option with ‘Site type - Team sites’ to get all the team sites created within your SharePoint Online environment.
team-site-qn-2

How to manage site creation in SharePoint Online?

As a SharePoint admin, you can empower your users to create and manage their SharePoint sites independently. You can customize the permissions to allow only specific users to create a SharePoint site.

By default, users can create both communication sites and team sites that are linked to their Microsoft 365 groups.

Enable site creation in SharePoint Online

  • Login to the SharePoint Online admin center.
  • Click the ‘Settings’ tab . Then, on the Site creation page, check the 'Users can create SharePoint sites' box. Enable options for creating sites and shared libraries.
  • Then, specify settings for Microsoft 365 group-connected team sites, including time zone and storage limit. Now, select ‘Save’.

Enable subsite creation in SharePoint Online

  • Login to the SharePoint Online admin center.
  • Click the ‘Settings’ tab and navigate to the ‘Classic settings page’.
  • Under the ‘Subsite creation’ section, select the ‘Enable subsite creation for all sites’ option, and click ‘OK'.
  • Then, select the ‘Show the create site command’ option in the ‘Site creation’ section.
  • If you choose not to activate this feature, keep the default setting, which is disabled.

Pro Tip: Optimal SharePoint Online management involves disabling subsite creation and utilizing hub sites for centralized control over permissions, storage, add-ons, services, and sharing at the site collection level.

How to create a subsite in SharePoint Online?

A SharePoint Online subsite refers to a website nested within a parent SharePoint site, enabling users to efficiently organize and manage content with tailored permissions and configurations.

Discover the techniques for creating and overseeing subsites in SharePoint to enhance team collaboration.


Follow the steps below to create a subsite in SharePoint Online:

  • Go to your SharePoint Online site.
  • Click on Site contents in the left panel. Once navigated, click +New and select Subsite.
  • Fill in the required information based on your needs.
  • Choose a template from the Templates selection. If it's for document collaboration, the default Team site template is usually a good choice.
  • Decide on permissions. If you want a new set of permissions, choose 'User unique Permission'. Otherwise, it will inherit the permissions from the parent site.
  • Click on Create.

When creating a new SharePoint Online subsite, you can choose either to inherit permissions from the parent site or have unique permissions for the subsite. If necessary, permission settings can also be modified to switch between inheritance and unique permissions.

Move a subsite within the site collection

If you’re willing to move the third-level subsite to another second level (i.e.) to a parent site, follow these steps to organize subsites in a nested structure.

  • Access the ‘site manager’ page using the provided link:

    https://yourtenant.sharepoint.com/sites//_layouts/15/sitemanager.aspx

    - On the site manager page, you will see a tree view displaying sites, folders, lists, and libraries. Locate the subsite you wish to move
  • Select the desired subsite and click on Move.
  • A new window will appear after selecting the move operation. Here, specify the target site within the site collection.
  • Choose the destination SharePoint site and confirm your selection by clicking the 'OK' button.

Note: The site manager page can only be accessed by SharePoint administrators and Global administrators.

With AdminDroid, you can easily view the list of all subsites within a SharePoint Online site collection.

  • Make use of the interlinks in the Total sites column to view all the sites within the site collection. Also, it is important to note that the count may include the parent site, so you can easily find the subsites by excluding the parent site.
  • Screenshot Hint: The highlighted one below is the parent site, while the others are subsites within the collection.
move-qn-4-2

How to create a hub site in SharePoint Online?

Hub sites in SharePoint Online offer a flexible and efficient way to organize related sites into a central portal and manage all the connected sites based on organizational attributes such as projects, concepts, teams, departments, divisions, and regions.

A SharePoint hub site can be linked to both modern team sites and communication sites.

To create a hub site, you must register a site to a hub and then associate other sites to the registered hub site.

Register a hub site in SharePoint Online:

  • Login to the SharePoint Online admin center.
  • Select the site, navigate to Hub on the command bar, and then click Register as a hub site.
  • Enter a name for the new hub in the panel that appears on the right.
  • Specify users who can associate sites with the hub.
  • Click the 'Save' button at the bottom of the panel.
After completing these steps, the selected site becomes the hub site for a newly created hub. Now, you can proceed to associate other SharePoint sites with this hub as needed.

Associate a SharePoint site with a hub site:

  • Login to the SharePoint Online admin center.
  • Select the site you want to associate with another hub. Then, in the Hub dropdown, select "Associate with a hub option".
  • On the next screen, select a hub you would like to associate with.
  • Also, if you wish to associate multiple sites to a hub, select those sites and click on the 'Bulk edit' button in the command bar.
  • Now, click on the hub association option. Once done, a panel will appear, then choose a hub for associating the site(s). Click the ‘Save’ button.

Using Microsoft PowerShell

Run the below cmdlet to register a new site collection as a hub site using PowerShell.

Register-SPOHubSite https:///sites/ -Principals $null
Run the below cmdlet to associate a site with a hub site using PowerShell.

Add-SPOHubSiteAssociation -SiteUrl -HubSiteId

Efforlessly monitor the hub sites creation in SharePoint online Using AdminDroid.

  • you can get comprehensive insights into the users responsible for creating these hub sites and their associated sites.
  • Also, the alerting feature will keep you informed whenever a new hub site is registered in your SharePoint environment.
create-hub-site-qn5

How to sync hub permissions to associated sites in SharePoint Online?

SharePoint Online sync hub permissions will be helpful in giving users visitor access to all the sites within a hub without having to manually add them to each site. Associating a SharePoint site with a hub site facilitates seamless exploration of related content, news, and site activity across all associated sites.

Follow the steps below to enable hub sync permissions in SharePoint Online.

  • Go to the parent hub site. Click on the Gear Icon»Site Permissions.
  • Navigate to the hub tab and activate the 'Sync hub permissions to associated sites' toggle switch. Then, include the user/group of your choice to grant read-only access to both the hub and all associated sites.

Note: You cannot grant permissions exclusively to a distribution list.

You can also enable the sync permissions from any of the associated sites.

  • Navigate to one of the associated sites and select Gear Icon»Site Permissions, then click on the Hub Tab at the top.
  • Enable the toggle switch to sync Hub permissions to this site.

With AdminDroid, you can effortlessly track whether permission sync has been enabled for a hub site to ensure consistent access across all associated sites within the hub. As an administrator, monitor visitors' access permissions and who assigned them.

hub-site-assoc-qn6

How to manage SharePoint Online permissions?

To prevent data leaks and work efficiently in SharePoint Online, it's important to set permissions based on user’s roles and tasks. There are different permission levels for the entire site collection, specific sites, lists, and individual items. For instance, a site owner can create or delete pages, while a site member can only edit or view them.

SharePoint utilizes permission levels, such as Full Control, Design, Edit, Contribute, and Read to define specific actions users or groups can perform.

Access is granted through two methods in SharePoint Online:

  • By direct assignment to SharePoint sites, lists, or list items with a particular permission level.
  • By adding users or security groups to a SharePoint group already assigned with a specific permission level.

Understanding these levels is crucial before making any modifications.

Create custom SharePoint groups and permissions:


To create a custom SharePoint permission,
  • Select the desired site. Then, under Gear Icon»Site Permissions.
  • Now click ‘Advanced permission settings’ and navigate to 'Permission Levels,' to ‘Add a Permission Level, by specifying the desired permissions, and establish the group for the newly created permission level.
To create a SharePoint group with the custom permission level,
  • Once navigated to the Advanced permission settings under 'Site Permissions' by clicking ‘Site settings’.
  • Create a 'Group' from the 'Permissions' tab and fill out details. Now select the desired custom permission level and create the group for site access.

Add members to your SharePoint team site:

To give user access to a SharePoint Online site, navigate to the desired site and select "Add members" under Site permissions and proceed by selecting the desired options provided below.


To Add Members to Office 365 Group:
  • Choose Add Members to Group.
  • Enter a name/email and click 'Save'.
To Share Site Only (Without Office 365 Group):
  • Select Share Site Only.
  • Enter a name or email, choose permission level, and click 'Add.'
hub-permission-qn7

AdminDroid SharePoint Online ReporterElevate Your SharePoint Online Management to New Heights!

Featuring AdminDroid's SharePoint Online management tool an asset to elevate your capabilities in optimizing SharePoint Online. This tool provides comprehensive insights into critical aspects such as SharePoint site permissions, external file sharing, site storage utilization, ownership details, group memberships, and more. By closely monitoring these reports, you can prevent data misuse within the organization.

Explore the advanced capabilities of AdminDroid for comprehensive SharePoint Online administration.

With All Site Collections report you can view all sites and subsites in SharePoint Online, including their type and storage details. This facilitates the efficient management of SharePoint Online site collections, empowering admins to maintain a secure and organized collaborative environment.

A Quick Dive into the Functionalities

Track File Access Activities in SPO

Secure your environment with AdminDroid's detailed SharePoint file access report. With this report, you can easily get insights into user activity and file interactions.

Monitor Site Collection Admin Changes

Audit SharePoint site collection admin additions within your Microsoft 365 environment to efficiently track all admin-related changes, ensuring that only legitimate users are added as admins.

Alerts on Site Collections Deletions

Receiving real-time alerts on SharePoint Online site collection deletions helps admins to stay updated and promptly identify any changes that require immediate action.

Visualize SharePoint Data with Graphical Charts

Leverage the SharePoint analytics dashboard to get a comprehensive view of SPO sites, inactive sites, sharing configurations, and site storage usage.

Comprehensive SharePoint Online Oversight

Getting hands on SharePoint Online insights enables you to visualize site collections, lists, external sharing settings, and SharePoint groups effectively.

Review SharePoint Online DLP

Keep an eye on the SharePoint Online DLP rule matches report for detecting and preventing the loss of sensitive information.

In summary, these tips and best practices offer a practical roadmap for SharePoint admins to efficiently configure SharePoint site and manage site access permissions in Microsoft 365. By following these insights, admins can enhance SharePoint security measures to safeguard against potential vulnerabilities and elevate their overall SharePoint Online management with ease.

Kickstart Your Journey with AdminDroid

Your Microsoft 365 Companion with Enormous Reporting Capabilities!

Common Errors and Resolution Steps related to SPO sites in SharePoint Online

The following are the possible errors and troubleshooting hints while getting all SPO sites in SharePoint Online.

Error: Get-SPOSite: The term 'Get-SPOSite' is not recognized as the name of a cmdlet.

This error occurs when the SharePoint Online Management Shell module is not installed or imported.

Troubleshooting hint :Run the below cmdlet for installing it.

// Run the below cmdlet for installing it.
Install-Module -Name Microsoft.Online.SharePoint.PowerShell -Force -AllowClobber
// Run the below cmdlet for importing it.
Import-Module Microsoft.Online.SharePoint.PowerShell

Error: Connect-SPOService: Unable to connect to the SharePoint Online service.

This error occurs when there is an issue with authentication or the provided credentials.

Troubleshooting hint :Recheck and update the SharePoint Online admin credentials. Use the following cmdlet to connect.

Connect-SPOService -Url https://-admin.sharepoint.com -Credential $adminCred

Error: Get-SPOSite: Access is denied. You do not have permission to perform this action.

The Microsoft 365 user running the PowerShell cmdlet lacks the necessary permissions to retrieve site information.

Troubleshooting hint :Ensure that the account has the required SharePoint admin or site collection administrator permissions. Verify permissions using the SharePoint admin center.

// Run the below cmdlet for Connecting to SharePoint Online Tenant Admin.
Connect-SPOService -Url https://-admin.sharepoint.com -Credential $adminCred
// Run the below cmdlet to disable the ‘DenyAddAndCustomizePages’ flag.
Set-SPOSite Url https://-admin.sharepoint.com -DenyAddAndCustomizePages $False

Error: Get-SPOSite: The site with the URL '' could not be found.

The specified SharePoint Online site URL is incorrect or does not exist.

Troubleshooting hint :Double-check the site URL and verify whether the site exists. Ensure proper connectivity and that the site is accessible.

Error: Set-SPOSite: The site is locked for editing and cannot be modified.

This error indicates that the SharePoint site is currently locked for editing, and modifications are not allowed.

Troubleshooting hint :Check if the site is locked and unlock it using the following cmdlet.

Set-SPOSite -Identity  -LockState Unlock