🎉 Our Office 365 Reporting Tool is now available in Azure Marketplace 🚀
This website uses cookies to improve your experience. We'll assume you're ok with this. Know more.
Exchange Online

How to Get Users’ Email Addresses and Aliases in Microsoft 365

In a large Microsoft 365 organization, managing users' email addresses and aliases can be overwhelming. Without a clear view of all aliases, you may miss important ones, leading to incomplete email reports and potential security gaps. This guide will help you find users' email addresses and aliases in Microsoft 365, providing valuable insights to ensure that all communications are properly tracked. Let's make your Exchange Online environment organized and secure!

Using Microsoft Purview Compliance Portal

Microsoft 365 Permission Required
Global Reader Least Privilege
Global Admin Most Privilege
  • Sign-in to the Microsoft 365 admin center.
  • Navigate to Users»Active users.
  • Select a user to view their email address and aliases under the 'Account' section.
Using Microsoft Purview Compliance Portal

Using PowerShell Script

Microsoft 365 Permission Required
Global Reader Least Privilege
Global Admin Most Privilege
  • Are you spending hours manually checking each Microsoft 365 account to find email addresses and aliases?
  • Use our PowerShell script to get all Office 365 email addresses and aliases, along with the recipient mailbox type, and export the data to a CSV file.
  • Download the script and run it in Administrator PowerShell.
Using PowerShell Script
GetAllOffice365EmailAddresses.ps1
  • The script covers the following requirements for retrieving all email addresses and aliases in Office 365.
    • Retrieves each mailbox’s primary email address and their associated aliases.
    • Lists a complete guest users' email addresses in Exchange Online.
    • Also gets the email addresses of mail contacts in Exchange Online.

Effortlessly manage email aliases in Microsoft 365 for seamless communication!

AdminDroid's Exchange Online reporting tool offers a comprehensive solution for Microsoft 365 admins. It easily helps you to manage mail statistics, gain valuable insights into email addresses and aliases in M365, without the need for complex PowerShell scripts.

Stay Updated on Mailbox Changes

Get a detailed overview of every change to Exchange Online mailboxes, including email address updates, alias creation, and modifications, with AdminDroid’s Mailbox Changes report.

Track all Undelivered Mails in Exchange Online

Get a list of undelivered emails in Exchange Online to ensure no important emails sent to any of your email addresses and aliases go unnoticed.

Delegate Exchange Reports to Desired Users

AdminDroid's Microsoft 365 delegation feature enables you to provide granular access to users within the portal for monitoring Exchange Online and email reports.

Get Instant Alerts on Unusual Mail Flows

Create an alert policy to detect and send notifications when an unusually high number of emails are sent to a specified email address or alias, such as those used for handling customer queries.

Automate Email Statistics Summaries

AdminDroid offers the ability to schedule reports on user email activity in microsoft 365 Admins can select the desired alias and track its statistics periodically from their mailbox.

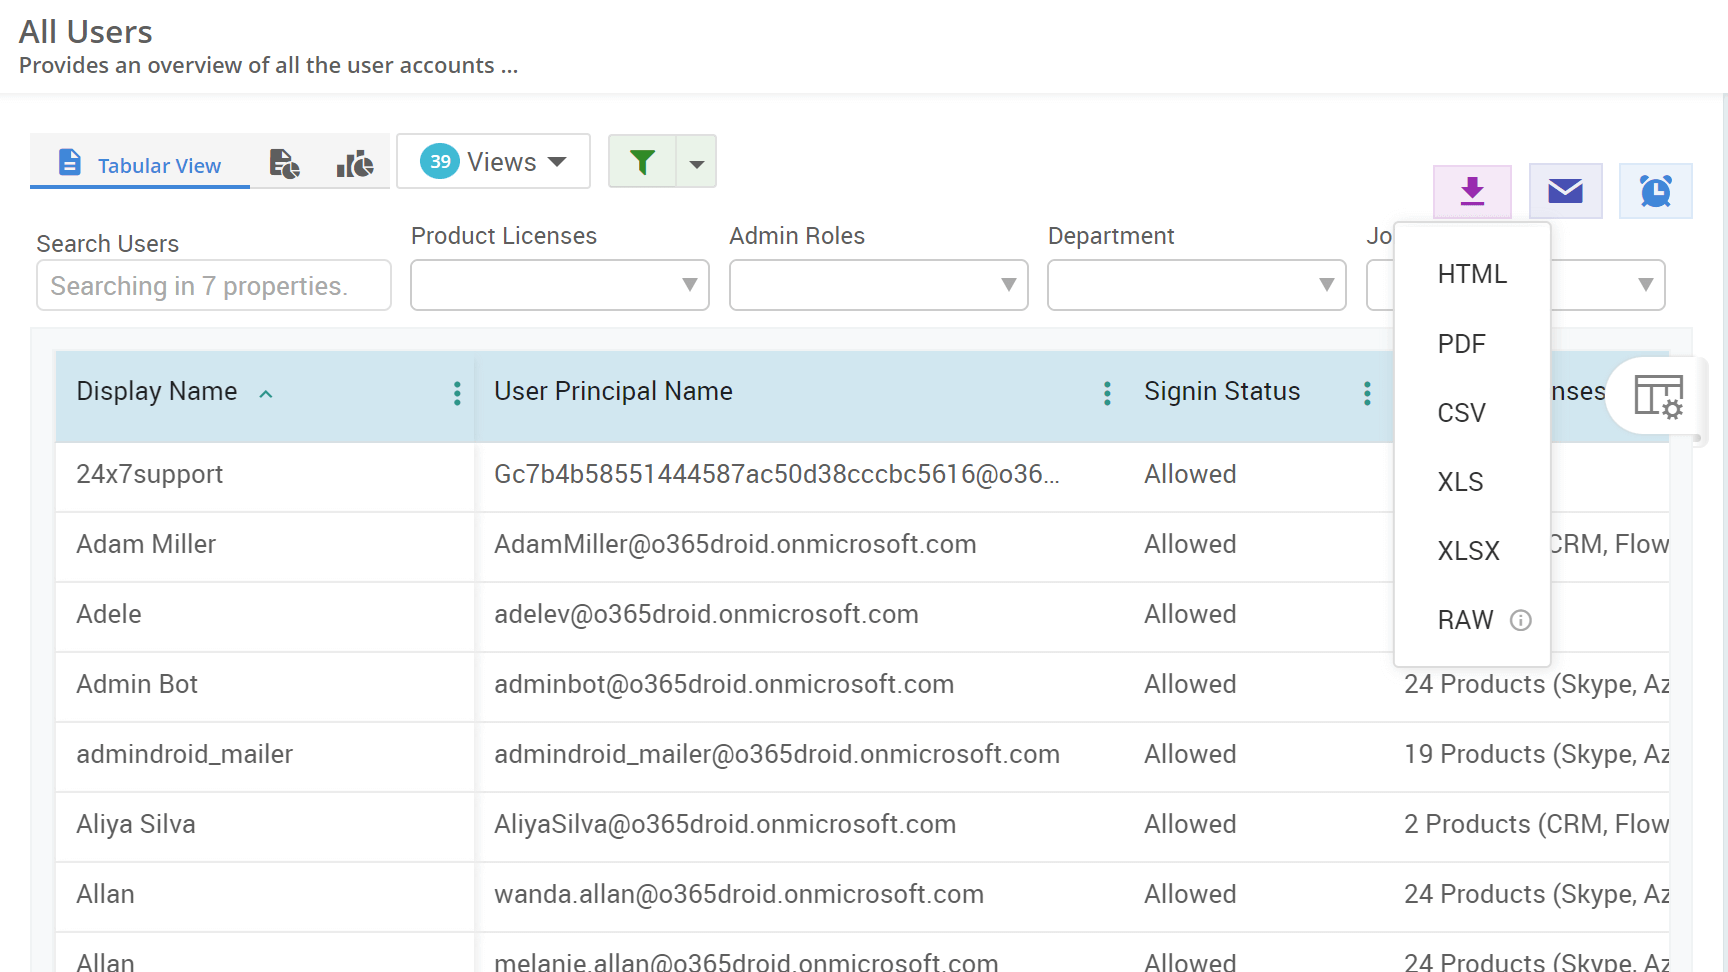
Export All your Email Addresses and Aliases

Export a report of all your mailbox email addresses and aliases in your preferred format, such as PDF or CSV, with just a few clicks for efficient offline access.

Overall, AdminDroid's Exchange Online management tool tool not only assists in exporting reports on email addresses and aliases but also offers comprehensive insights into your organization's email communication.

  • It provides detailed email statistics, such as emails sent from or received via aliases, ensuring safe and efficient communication in Exchange Online.
  • Simplifies the tracking of inbox rules and mail flow rules in Exchange Online.
  • Generate alerts for unusual mail flow and activities to improve email security in Exchange Online.

Explore a full range of reporting options

Important Tips

Advise your users to set up multiple signatures in Outlook so they can select the preferred one manually when sending emails from different aliases.

Configure forwarding rules in Exchange Online for redirecting emails sent to a specific email address or alias to another mailbox when the intended recipients are unavailable.

Organize your alias emails into specific folders using inbox rules and apply retention policies to those folders to optimize mailbox storage.

Common Errors and Resolution Steps

Below are some potential errors and troubleshooting tips you might encounter when handling Exchange Online email addresses and aliases.

Error You cannot send mails from your alias email.

This error can be named as "Send-As Permission Restriction" in Microsoft 365 or Exchange Online.

Fix Ensure that the user attempting to send emails from the alias address has been granted 'Send As' permissions for that alias.
Set-OrganizationConfig -SendFromAliasEnabled  $true
//Enable send from alias for specific user.
Add-RecipientPermission -Identity "<UserUPN>" -Trustee "<AliasEmailAddress>" -AccessRights SendAs

Error You can’t use the domain because it is not accepted in your organization.

This error message might appear when trying to configure an email address or domain that your organization does not recognize or permit, possibly due to incorrect domain entry.

Fix Enter the email address with the correct domain to ensure it aligns with your organization’s accepted domains.
//To check the accepted domains in your Microsoft 365 organization.
Connect-ExchangeOnline
Get-AcceptedDomain

Error ./GetAllOffice365EmailAddresses.ps1 cannot be loaded because running scripts is disabled on this system.

The script encounters this error due to the current execution policy is set to restricted, which prevents script execution.

Fix To resolve this error, you can set the execution policy as Remote Signed and run the script.
Set-ExecutionPolicy -ExecutionPolicy RemoteSigned 

Error Proxy Address Exists Exception | The proxy address is already being used by the proxy addresses or LegacyExchangeDN of Another shared mailbox. Please choose another proxy address.

This error occurs because the new alias address might already be assigned to another shared mailbox.

Fix To assign the same email alias address to a new shared mailbox, first remove the alias from the existing shared mailbox.
//Remove the alias from the existing shared mailbox.
Set-Mailbox -Identity "<OldSharedMailboxUPN>" -EmailAddresses @{remove="<AliasEmailAddress>"}
//Add the alias to the new shared mailbox.
Set-Mailbox -Identity "<NewSharedMailboxUPN>" -EmailAddresses @{add="<AliasEmailAddress>"}

Frequently Asked Questions

Create and Manage Email Aliases for Effective Communication in Microsoft 365!

How to add or remove email aliases from a user mailbox in Microsoft 365?

How to add or remove email aliases from a user mailbox in Microsoft 365? +

Users in your organization typically send and receive all emails through their primary email addresses. However, when users collaborate on multiple projects or manage various departments, email aliases are useful for differentiating communication.

Also, email aliases can protect your primary address when registering on websites, keeping it safe from marketers and hackers. They work as a proxy for your primary email address.

Follow the steps below to create or remove aliases from a M365 account.

  • Sign-in to the Microsoft 365 admin center and navigate to the 'Active users' tab under Users.
  • Select a user and then click on Manage username and email under 'Aliases' Section.
  • On the 'Manage username and email panel', go to the 'Aliases' section. Enter the username, select the appropriate domain, and then click 'Add' to create the email alias.
  • To delete an alias, click ellpises (...) next to the alias email and choose 'Delete alias'.

Note: Initially, the default domain will be selected. To add an email alias from a different domain, use the drop-down menu to select the desired domain.

Add or remove an email alias using PowerShell.

You can utilize the following PowerShell cmdlets to efficiently add or remove an alias in Exchange Online.

#Connect to the Exchange Online module
Connect-ExchangeOnline
# To create an email alias in an Exchange Online mailbox.
Set-Mailbox "<UserPrincipalName>" -EmailAddresses @{add= "<AliasEmailAddress>"}
# To add multiple email aliases to an Exchange Online mailbox.
Set-Mailbox "<UserPrincipalName>" -EmailAddresses @{add= "<AliasEmailAddress1>", "<AliasEmailAddress2>"}
# To remove an email alias from an Exchange Online mailbox.
Set-Mailbox "<UserPrincipalName>" -EmailAddresses @{remove= "<AliasEmailAddress>"}

To bulk add aliases in Office 365 using PowerShell.

Create a CSV file with two columns: User and Alias. The User column should contain the mailbox UPNs, and the Alias column should contain the desired aliases. If a user needs multiple aliases, separate them with commas.

bulk-add-email-alias

After creating the CSV file, run the following cmdlet with the appropriate file path to create bulk email aliases for users in Exchange Online.

Import-CSV "<CSVFilePath>" | foreach {Set-Mailbox $_.UPN -EmailAddresses @{add=$_.Alias}} 

To add multiple aliases to a distribution group.

Aliases can be customized to represent the distribution group's purpose, making it easier for users to identify and send emails to the appropriate group.

Use the following PowerShell cmdlet to add an alias to a distribution group in Office 365.

Set-DistributionGroup -Identity "<DistributionGroupUPN>" -EmailAddresses @{Add= "<DesiredAliasEmailAddress1>","<DesiredAliasEmailAddress2>"} 
Note:
  • You can add up to 400 aliases for a single mailbox.
  • The same email alias cannot be assigned to different mailboxes.
  • An email alias can be changed to the primary email address.

How to enable sending emails from aliases in Office 365?

How to enable sending emails from aliases in Office 365? +

To allow your users to send emails via the added aliases, you must configure the mail flow settings in Exchange Online. Follow the below steps to enable sending from aliases in Exchange Online.

  • Open the Exchange admin center.
  • Navigate to Settings»Mail flow. and check the Turn on sending from aliases option.
send-from-alias-exchange

Enable 'send from alias' using PowerShell

To enable sending emails from aliases using PowerShell, execute the following cmdlet.

Connect-ExchangeOnline
Set-OrganizationConfig -SendFromAliasEnabled $True 

Note: All alias changes will take up to 24 hours to take effect.

Effortlessly track which aliases send the most emails in Microsoft 365!

Using the Top Mail Senders report in AdminDroid, you can pinpoint the email addresses or aliases that are sending the most email messages. You can filter the report based on specific email addresses or aliases to identify the number of emails sent by them in the past 'n' days.

top-mail-sender

How to tell if an email was sent to an alias in Microsoft 365?

How to tell if an email was sent to an alias in Microsoft 365? +

By examining the 'To' address in the email header, you can see if the email was sent to an alias. For easier management, you can set up inbox rules to automatically move emails sent to an alias into a specific folder.

This enables you to quickly access and respond to emails related to a specific alias without searching through a busy primary inbox.

Follow these steps to move emails received by an alias address into another folder.

  • Login to your Microsoft 365 Outlook.
  • Click Settings button (gear icon).
  • Navigate to Mail»Rules or just type 'Inbox Rules’ in search menu.
  • Click Add new rule and name your rule. Set the condition to 'Recipient address includes' and enter the alias address you want to track.
  • Add the 'Move to' action, then choose 'Create a new folder' from the drop-down menu and enter the name of the folder.
  • Check the boxes for 'Stop processing more rules' to prevent conflicts with other inbox rules, and 'Run rule now' to execute the rule immediately. Then, hit 'Save'.
inbox-rules-configurations

Keep an eye on inbox rules for optimal mailbox management!

Tracking inbox rule configurations is crucial for ensuring compliance and security, as it helps prevent unauthorized changes and suspicious rules like external forwarding or email deletion.

  • The Office 365 Inbox Rule Configurations report in AdminDroid allows you to track all inbox rules effectively.
  • Utilize the graphical view to review all inbox rule configurations. It offers detailed information about mailboxes, including the configured inbox rules, their conditions, and the corresponding actions.
inbox-rule-graph-view

Can we add the same alias to multiple users in Exchange Online?

Can we add the same alias to multiple users in Exchange Online? +

No, adding an existing email address as an alias to a Microsoft 365 account is not possible. Once an alias is created for a user, it cannot be added to another user.

What if we need multiple users to share the same email address?

If multiple users need to share the same email address, you can use a shared mailbox in Microsoft 365. A shared mailbox allows multiple users to access, send, and receive emails from the same email address, making it a suitable solution for teams or departments that need to collaborate using a single email identity.

Execute the PowerShell snippet below to set up a shared mailbox with users having 'Full Access' and 'SendAs' permissions.

Connect-ExchangeOnline
$SharedMailboxUPN = "<SharedMailboxUPN>"
$SharedMailboxName = "<SharedMailboxName>"
$users = @("<DesiredUserUPN1>", "<DesiredUserUPN2>")
New-Mailbox -Shared -Name $SharedMailboxName -PrimarySmtpAddress $SharedMailboxUPN
foreach ($user in $users)
{Add-MailboxPermission -Identity $SharedMailboxUPN -User $user -AccessRights FullAccess
Add-RecipientPermission -Identity $SharedMailboxUPN -Trustee $user -AccessRights SendAs}

If you want to grant a user permission to send emails on behalf of a shared mailbox, use the following cmdlet.

Set-Mailbox -Identity "<SharedMailboxUPN>" -GrantSendOnBehalfTo "<UserUPN>"

Effortlessly manage and monitor your Exchange Online shared mailboxes with AdminDroid's comprehensive report.

The All Shared Mailboxes report in AdminDroid provides an overview of all shared mailboxes in Exchange Online, detailing key information such as mailbox display names, primary SMTP addresses, alias email addresses, and more.

  • It includes data on mailbox sizes and quotas for sending and receiving emails, ensuring effective monitoring and management of shared email communications.
  • Additionally, it allows for review the members of shared mailboxes and their permission levels in Exchange Online.
shared-mailbox-report

How to configure mail flow rules for alias email addresses in Exchange Online?

How to configure mail flow rules for alias email addresses in Exchange Online? +

If you are using a shared mailbox to handle customer queries for different departments, such as sales, technical support, and remote support, you can create multiple email aliases for each department. By setting up mail flow rules, you can automatically append tags to incoming emails based on the alias address, such as 'For sales team', 'For technical team', and 'For remote support team'.

This approach helps you distinguish emails sent to each department, ensuring that the appropriate team members can respond to their queries from a single mailbox.

Follow the below to steps to create mail flow rules for the shared mailbox email aliases in Exchange Online.

  • Login to the Exchange admin center.
  • Navigate to Mail flow»Rules. Click Add a rule and choose "Create a new rule".
  • The new rule window will open. Enter the name of the rule in the Name (e.g., "sales") field.
  • Under the "Apply this rule if" drop-down list, select The recipient.
  • From the corresponding drop-down, select the option, matches any of these text patterns. In the 'Specify words or phrases' window, enter the alias email addresses for the respective team you want to be notified.
  • Under the "Do the following" drop-down list, select the Prepend the subject of the message with option.
  • In the 'specify subject prefix' window, enter the desired text (e.g., 'For Sales Team'), then click Save and Next.
  • Configure the Rule mode, Priority, Severity, and rule activation based on your needs, then click 'Next'.
  • Review all your configurations, click 'Finish,' and then enable the Transport rule.

Similarly, create transport rules for other email aliases of the shared mailbox.

exchage-mail-flow-configuration

Create a transport rule for each alias address of a shared mailbox using the PowerShell cmdlet below.

Connect-ExchangeOnline
New-TransportRule SupportQuaries -HeaderMatchesMessageHeader "To" -HeaderMatchesPatterns "<DesiredEmailAlias>" -PrependSubject "<SubjectPrefix>" -Priority "<Priority>"

Generate a report on transport rule changes in Exchange Online using AdminDroid.

  • This report offers a comprehensive view of transport rule changes in Exchange Online, detailing the operations performed, the users who made the changes, and any modifications made to the transport rules.
  • Additionally, you can set alerts for transport rule changes to promptly identify and address any suspicious or unauthorized rule modifications.
transportrule-admindroid-report
+

Kickstart Your Journey With
AdminDroid

Your Microsoft 365 Companion with Enormous Reporting Capabilities

Download Now
User Help Manuals Compliance Docs
x
Delivering Reports on Time
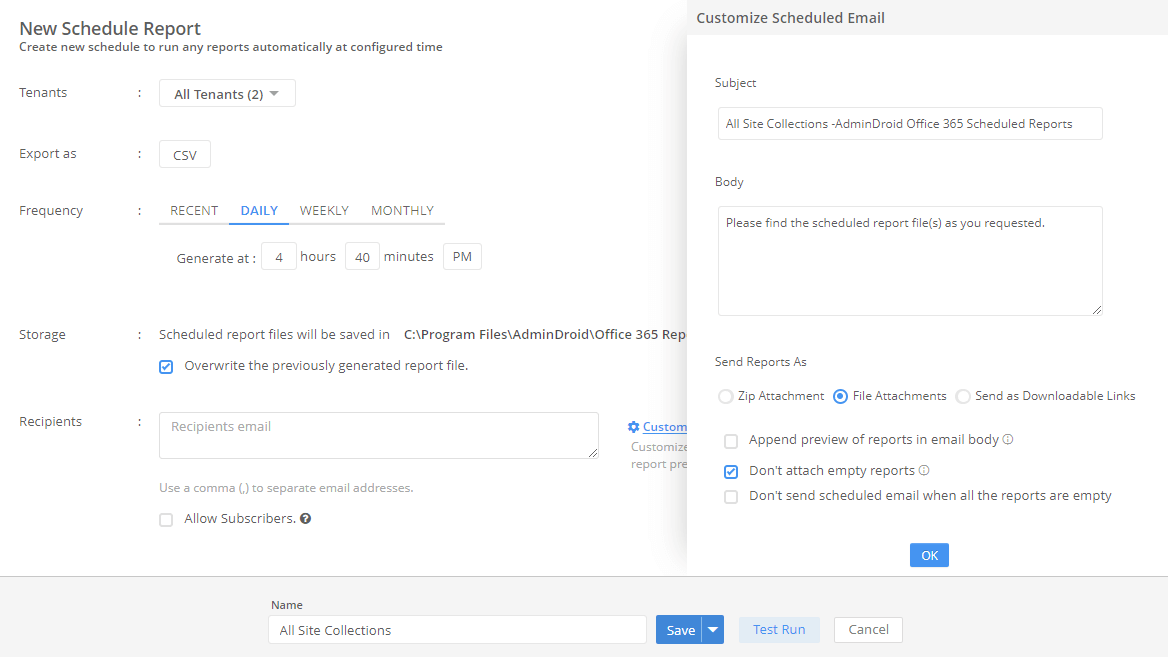
Want a desired Microsoft 365 reports every Monday morning? Ensure automated report distribution and timely delivery with AdminDroid's Scheduling to your email anytime you need.
Delivering Reports on Time
Schedule tailored reports to execute automatically at the time you set and deliver straight to the emails you choose. In addition, you can customize report columns and add inteligent filtering to the activities just from the previous day to suit your Microsoft 365 report requirements.
Set It, Schedule It, See Results- Your Reports, Your Way, On Your Time!
Time Saving
Automation
Customization
Intelligent Filtering
Give Just the Right Access to the Right People
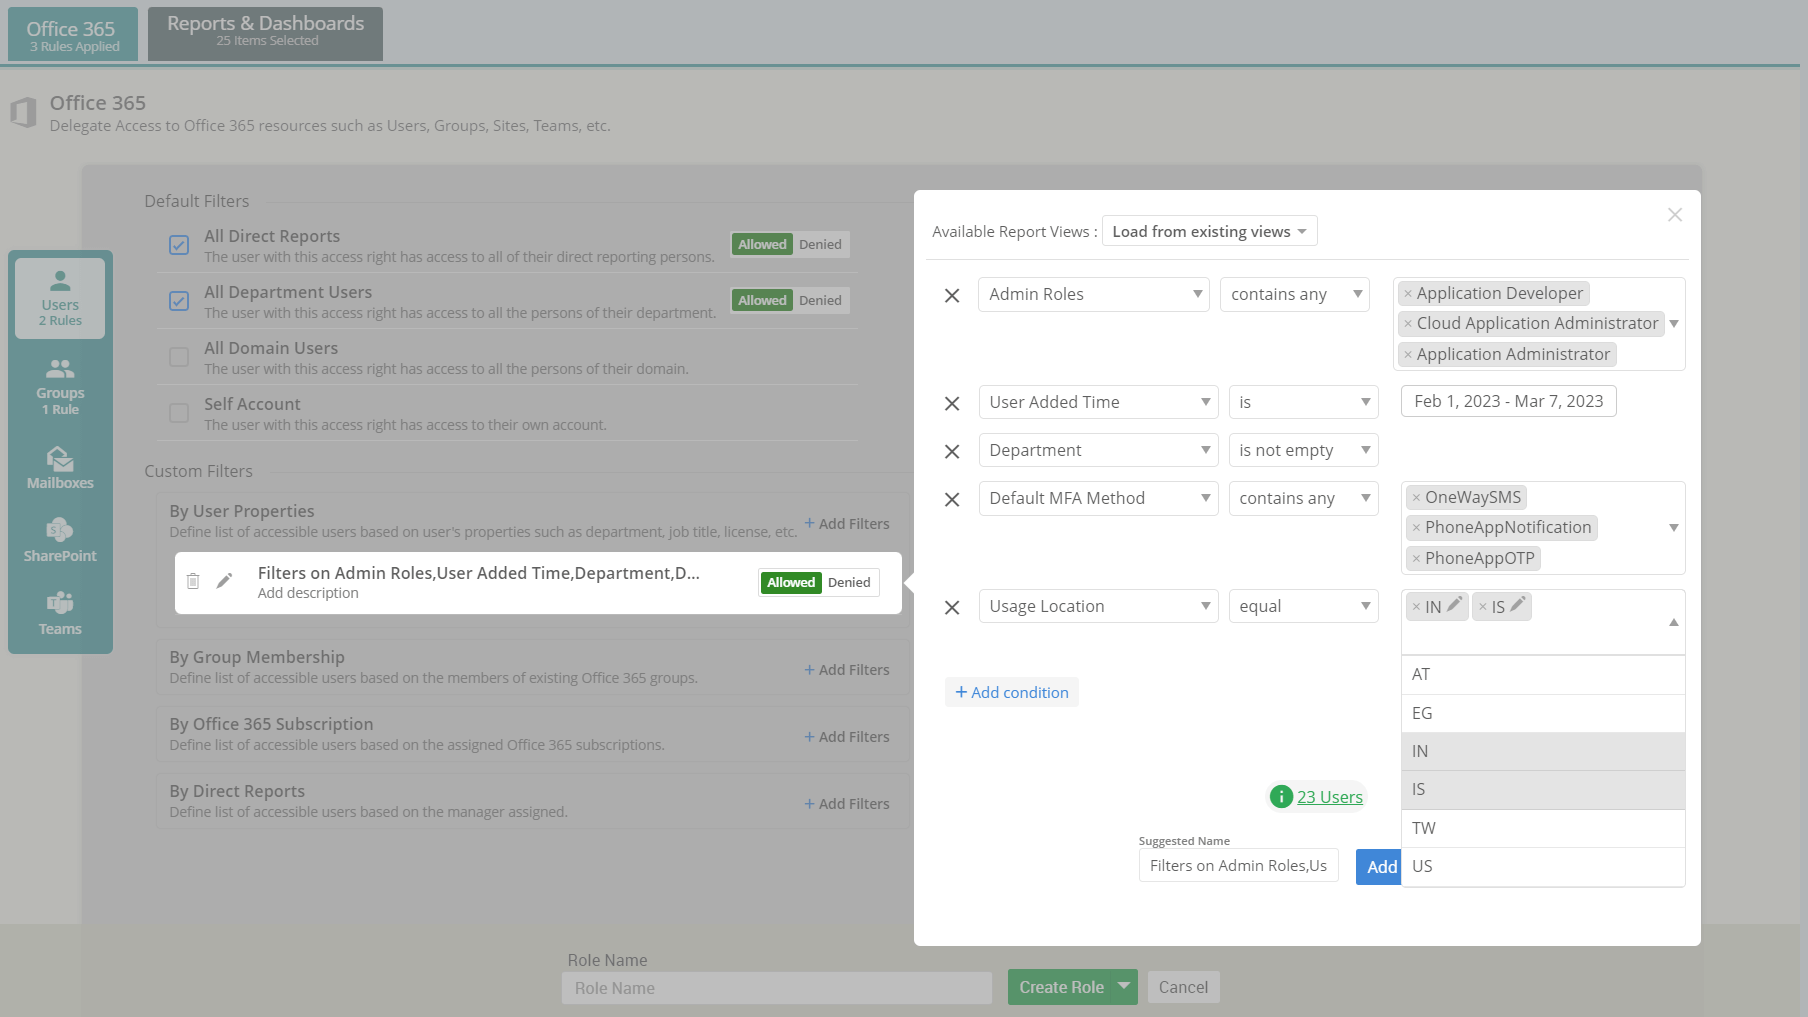
Grant fine-tuned access to any Microsoft 365 user with AdminDroid’s Granular Delegation and meet your organization’s security and compliance requirements.
Give Just the Right Access to the Right People
Create custom roles loaded with just the right permissions and give access to admins or normal users within AdminDroid. The result? A streamlined Microsoft 365 management experience that aligns your organization's security protocols and saves your invaluable time and effort.
Align, Define, Simplify: AdminDroid's Granular Delegation
Smart Organizational Control
Effortless M365 Management
Simplified Access
Advanced Alerts at a Glance
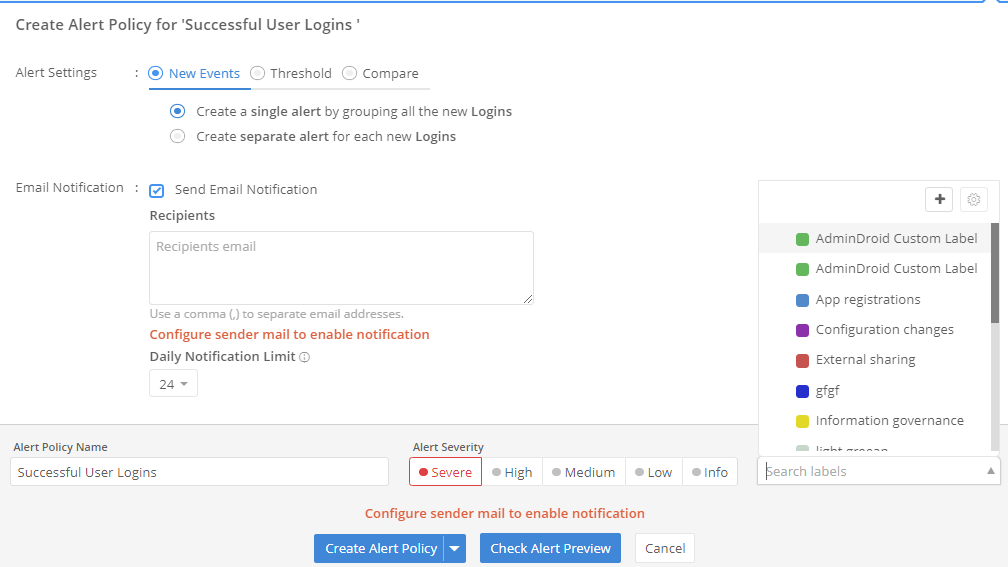
Receive quick notifications for malicious Microsoft 365 activities. Engage with the AdminDroid’s real-time alert policies crafted to streamline your security investigations.
Advanced Alerts at a Glance
Stay informed of critical activities like suspicious emails and high-risk logins, bulk file sharing, etc. Through creating and validating ideal alert policies, AdminDroid provides a comprehensive approach to real-time monitoring and management of potential threats within your organization.
AdminDroid Keeps You Always Vigilant, Never Vulnerable!
Proactive Protection
Real-time Monitoring
Security Intelligence
Threat Detection
Merge the Required Data to One Place
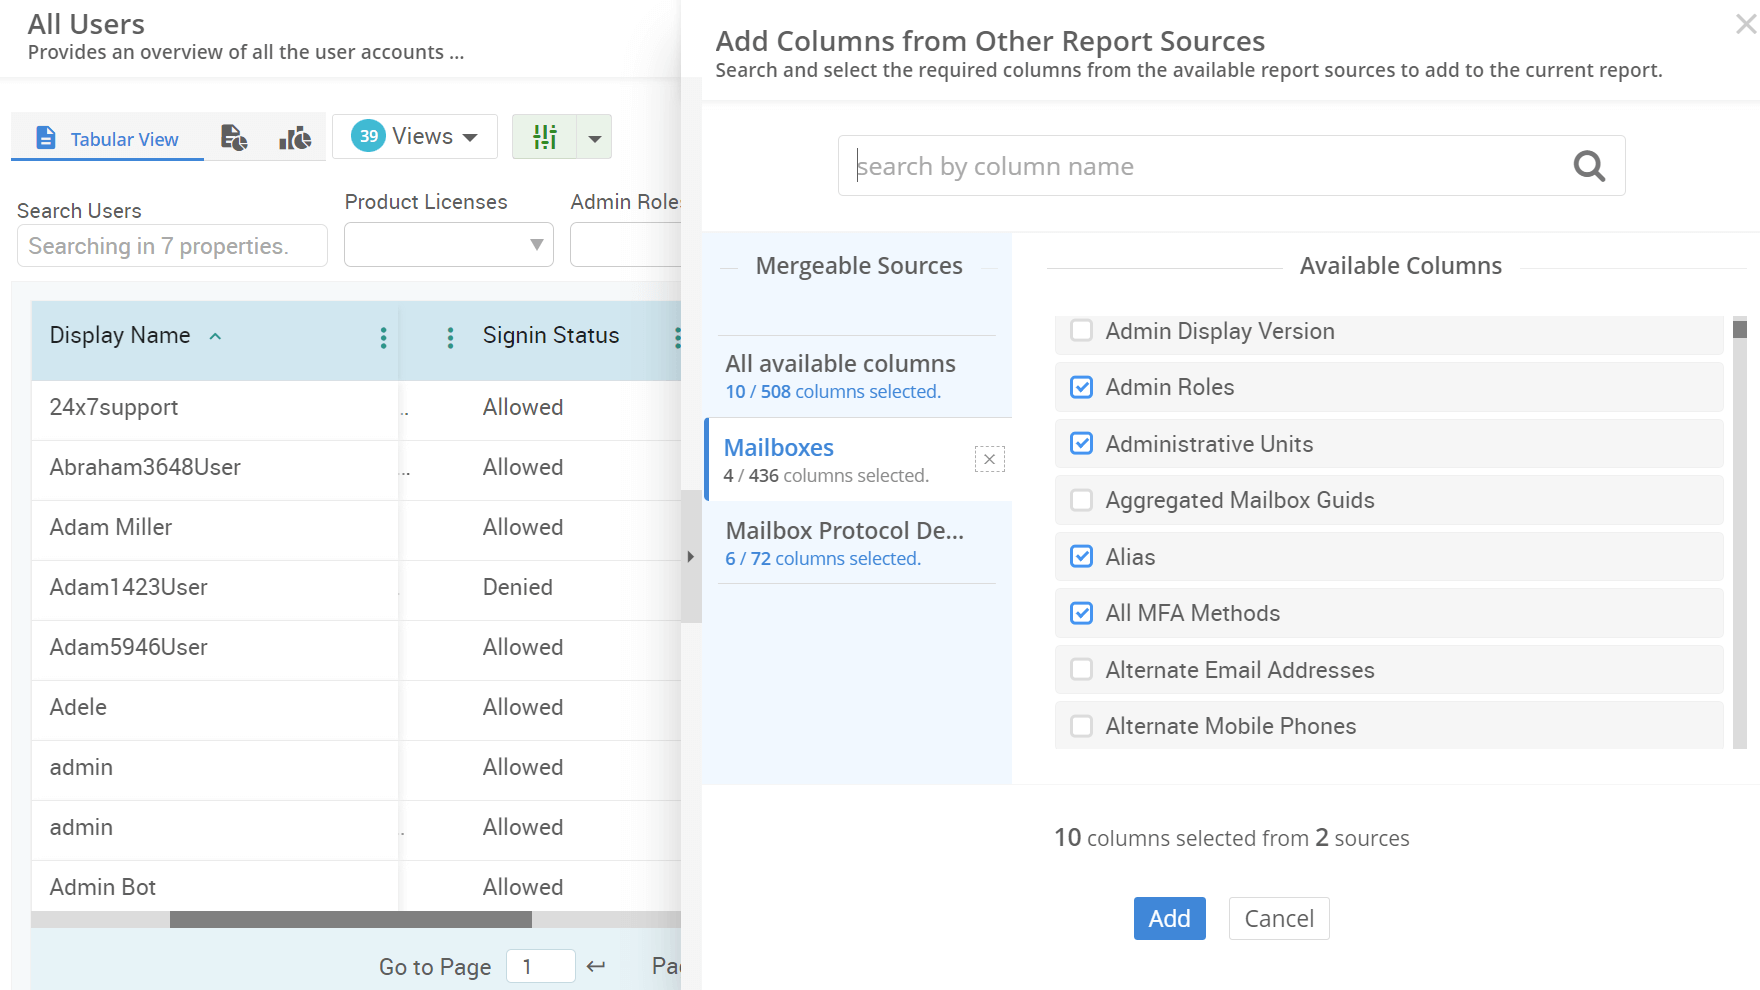
Combine multiple required columns into one comprehensive report and prioritize the information that matters most to you with AdminDroid’s Advanced Column Customization.
Merge the Required Data to One Place
This column merging capability offers a flexible way to add different columns from various reports and collate all the essential data in one place. Want to revisit the customized report? Save it as a 'View’, and your unique report is ready whenever you need it.
Merge with Ease and Save as Views!
Custom Reporting
Unique View
Desired Columns
Easy Data Interpretation
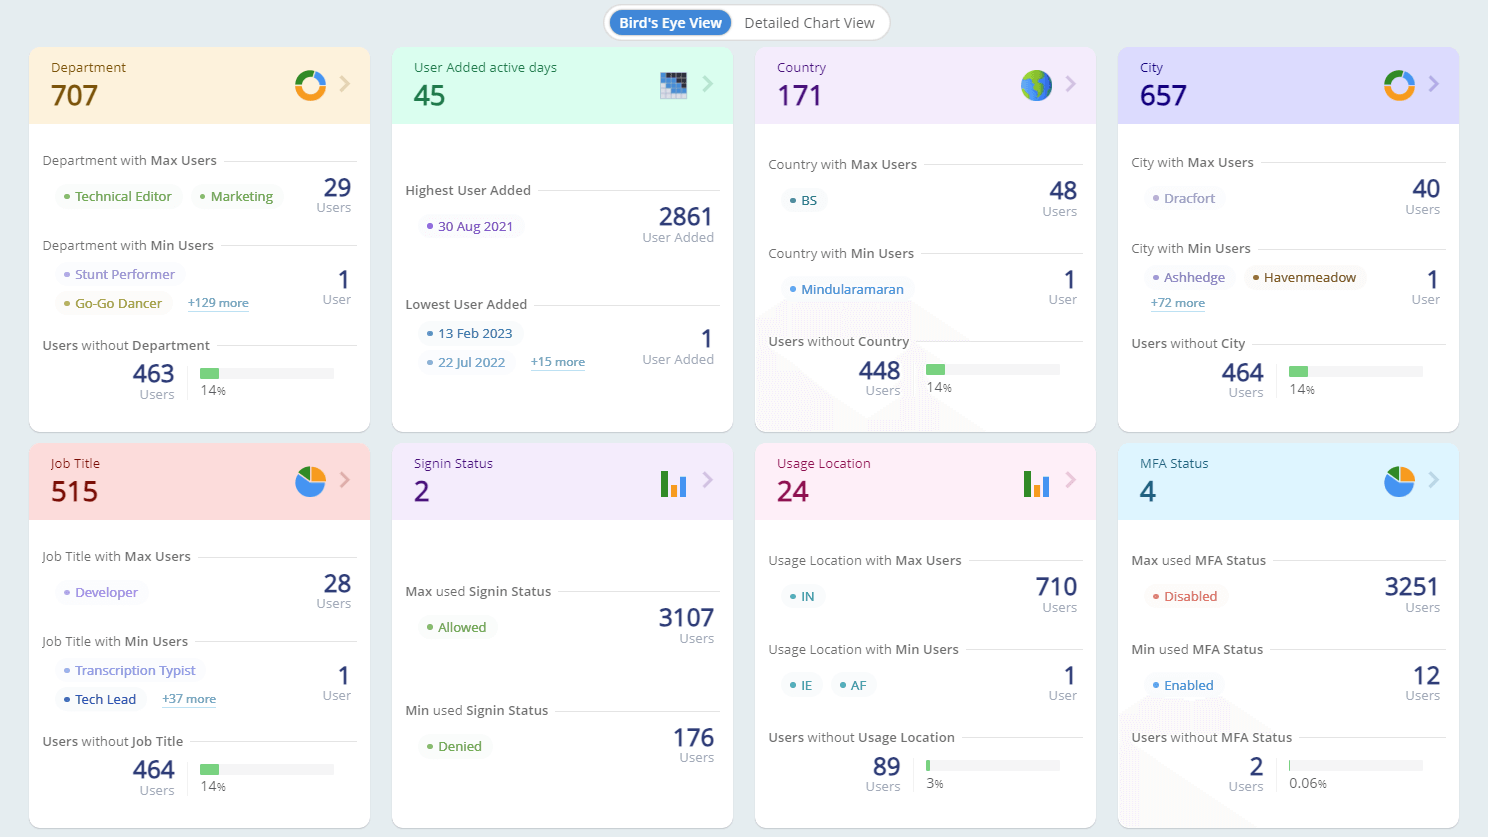
Insightful Charts and Exclusive Dashboards
Get a quick and easy overview of your tenant's activity, identify potential problems, and take action to protect your data with AdminDroid’s Charts and Dashboards.
Insightful Charts and Exclusive Dashboards
With AdminDroid charts and dashboards, visualize your Microsoft 365 tenant in ways you've never thought possible. It's not just about viewing; it's about understanding, controlling, and transforming your Microsoft 365 environment.
Explore Your Microsoft 365 Tenant in a Whole New Way!
Executive overviews
Interactive insights
Decision-making
Data Visualization
Efficient Report Exporting for Microsoft 365
Downloading your reports in the right file format shouldn’t be a hassle with AdminDroid’s Report Export. Experience seamless report exporting in various formats that cater to your needs.
Efficient Report Exporting for Microsoft 365
Navigate through diverse options and export Microsoft 365 reports flawlessly in your desired file format. Tailor your reports precisely as you need them and save them directly to your computer.
Take Control, Customize and Deliver- Your Office 365 Data, Exported in Your Way!
Easy Export
Seamless Downloading
Data Control
Manage Microsoft 365

Get AdminDroid Office 365 Reporter Now!